Yazi 是一款非常好用的命令行文件管理工具, 配合 Vim, 可以在非图形界面下很方便地浏览, 管理, 编辑文件.
Yazi 的官网提供了 详尽的配置方式说明, 但由于其兼容的系统较多, 每次想要找到一整套 windows 下的配置流程, 就比较麻烦. 因此这里总结了仅 windows 下的安装和基础配置方式.
安装
建议使用 scoop 安装. 没有 scoop 的可以先安装, 很好用.
scoop install yazi安装依赖
file 命令行工具
yazi 依赖 file 来判断文件类型, 因此基本是必须安装的.
yazi 不建议使用包管理器安装 file 命令行工具. 而是建议使用 Git 下的 file 命令行工具.
原文: We do not recommend installing
filevia Scoop or Chocolatey, since they cannot handle Unicode filenames (such asoliver-sjöström.jpg) properly and lack some required parameters.
如果电脑之前没有安装过 Git. 你可以去官网下载并安装; 如果安装了 scoop, 也可以直接使用 scoop install git 安装.
- 使用官方安装器安装的 Git,
file的路径通常是C:\Program Files\Git\usr\bin\file.exe. - 使用 scoop 安装的 Git,
file的路径通常是C:\Users\<用户名>\scoop\apps\git\current\usr\bin\file.exe.
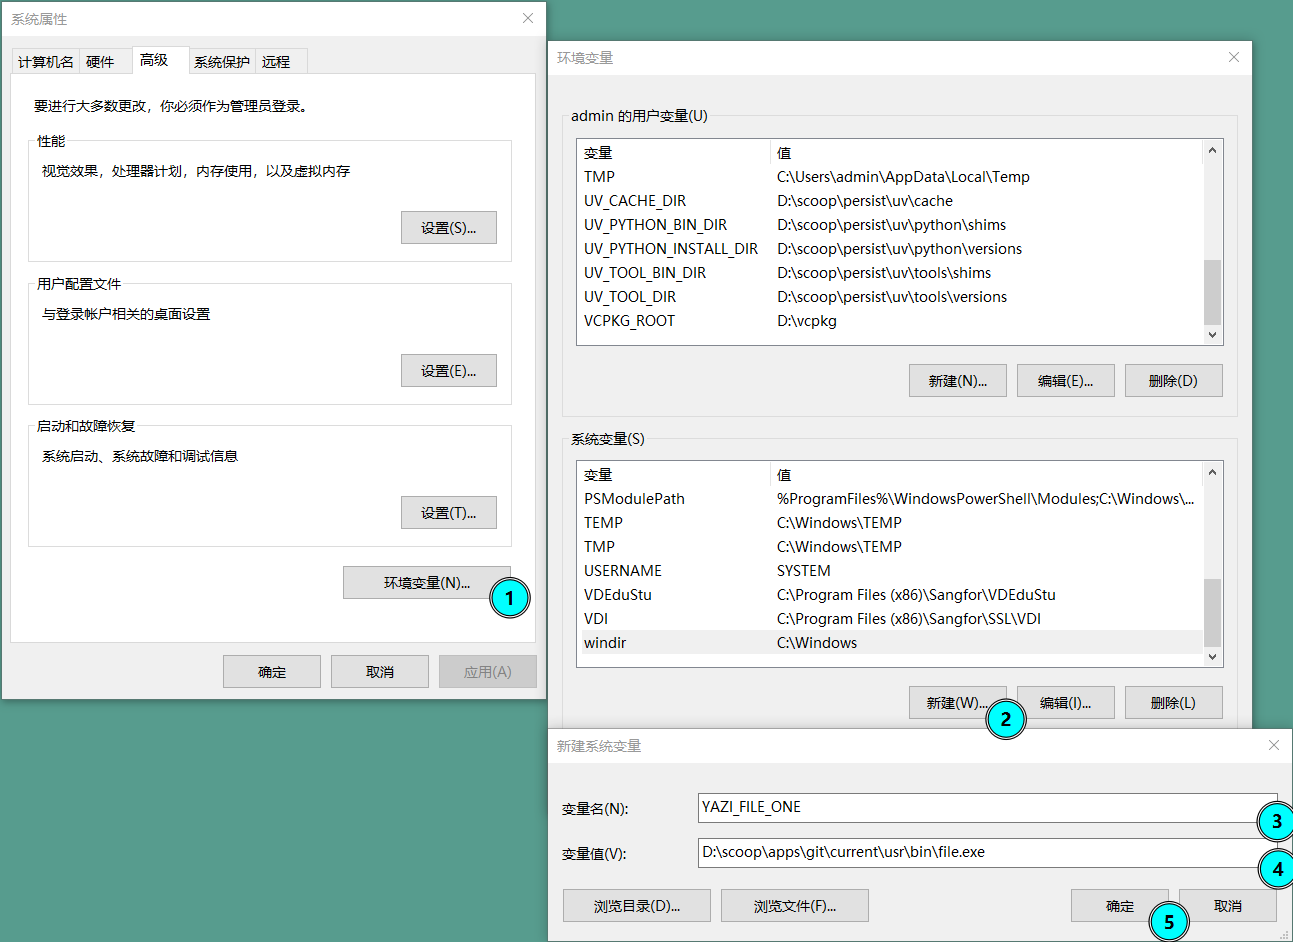
新建环境变量(想要快速到达界面, 可以按下 win + Q, 然后搜索 “编辑系统环境变量”), 键为 YAZI_FILE_ONE, 值为 file 的路径, 例如 C:\Program Files\Git\usr\bin\file.exe.
其它命令行工具
其它多种依赖建议直接使用 scoop 安装.
scoop install ffmpeg 7zip jq poppler fd ripgrep fzf zoxide resvg imagemagick配置 y 启动
yazi 建议至少配置一个 y 命令, 以在退出 yazi 后, 保持最后的目录位置.
针对不同的 shell, 配置方式不同
cmd(命令行提示符)
新建一个 y.cmd 文件(任何位置都行), 将其添加到环境变量(%PATH%). 内容如下:
@echo off

set tmpfile=%TEMP%\yazi-cwd.%random%

yazi.exe %* --cwd-file="%tmpfile%"

:: If the file does not exist, then exit
if not exist "%tmpfile%" exit /b 0

:: If the file exist, then read the content and change the directory
set /p cwd=<"%tmpfile%"
if not "%cwd%"=="" if exist "%cwd%\" (
	cd /d "%cwd%"
)
del "%tmpfile%"
pwsh(PowerShell)
在 pwsh 终端, 打开或新建 $PROFILE 文件. 如果不知道如何打开, 以下命令可以参考:
# 查看 $PROFILE 的路径
$PROFILE
# 看文件是否存在
Test-Path -Path $PROFILE
# 如果不存在, 创建文件
New-Item -Path $PROFILE -ItemType File -Force

# 直接使用单条命令保证文件存在
if (!(Test-Path $PROFILE)) { New-Item -Type File -Path $PROFILE -Force }

# 用记事本打开文件
notepad $PROFILE
添加以下内容到 $PROFILE 文件中, 保存后重启 pwsh 终端即可生效.
function y {
	$tmp = (New-TemporaryFile).FullName
	yazi.exe @args --cwd-file="$tmp"
	$cwd = Get-Content -Path $tmp -Encoding UTF8
	if ($cwd -and $cwd -ne $PWD.Path -and (Test-Path -LiteralPath $cwd -PathType Container)) {
		Set-Location -LiteralPath (Resolve-Path -LiteralPath $cwd).Path
	}
	Remove-Item -Path $tmp
}
nushell
在 nushell 中, 使用 $nu.config-path 找到配置文件路径, 打开并添加以下内容:
def --env y [...args] {
	let tmp = (mktemp -t "yazi-cwd.XXXXXX")
	^yazi ...$args --cwd-file $tmp
	let cwd = (open $tmp)
	if $cwd != $env.PWD and ($cwd | path exists) {
		cd $cwd
	}
	rm -fp $tmp
}
覆盖默认配置
新安装的 yazi 使用 默认配置. 想要自定义, 我们需要新建配置文件, 在其中覆盖默认配置.
- %AppData%\yazi\config\yazi.toml
- %AppData%\yazi\config\keymap.toml
- %AppData%\yazi\config\theme.toml
如果不知道 %AppData% 实际上指什么, 可以在 cmd 中执行 echo %AppData%, 或者在 pwsh 中执行 $env:AppData 查看, 或者在 nushell 中执行 $env.AppData 查看.
例如, yazi 默认打开文件的方式是 code. 但我都用命令行了, 更希望使用 vim 打开, 所以我创建了 yazi.toml 文件, 并填入以下内容:
# A TOML linter such as https://github.com/tombi-toml/tombi can use this schema to validate your config.
# If you encounter any issues, please make an issue at https://github.com/yazi-rs/schemas.

#:schema https://yazi-rs.github.io/schemas/yazi.json

[opener]
edit = [
        { run = "${EDITOR:-vi} %s", desc = "$EDITOR",      for = "unix", block = true },
        { run = "vim %s",           desc = "vim",          for = "windows", block = true },
        { run = "code -w %s",       desc = "code (block)", for = "windows", block = true },
]
以上内容是参考 官方默认配置 文件, 仅重写需覆盖部分而来. 有其它修改需求可以去那里看源文件.